Description
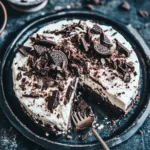
Dive into pure decadence with this Deliciously Indulgent No-Bake Oreo Cheesecake! A crunchy Oreo crust meets a rich, creamy cheesecake filling, loaded with crushed Oreos for the ultimate cookie lover’s dream. No oven, no hassle—just pure, irresistible bliss in every bite! 🍪✨
Ingredients
- OREOS. You will need 24 Oreos for the crust and additional Oreos for the filling.
- BUTTER. Melted butter is used to hold the crust together.
- CREAM CHEESE. Softened cream cheese gives the cheesecake its rich and creamy texture.
- SUGAR. Granulated sugar sweetens the cheesecake.
- HEAVY CREAM. Whipped heavy cream is folded into the cheesecake mixture for extra fluffiness.
- VANILLA EXTRACT. This adds flavor to the cheesecake mixture.
- OREO CRUMBLES. Crushed Oreos are mixed into the cheesecake filling for added flavor and texture.
Instructions
Start by taking a 9-inch springform pan and line the bottom with parchment paper. This small step will help you remove the cheesecake easily later. Greasing the sides lightly with butter ensures the cheesecake slides out without a hitch.
In a mixing bowl, combine crushed Oreo cookies with melted butter. Ensure every crumb is coated with butter; this will create a rich, delicious crust. Use a fork to mix until the crumb mixture resembles wet sand. Firmly press this mixture into the bottom of your prepared pan. Don’t worry if it seems a bit loose at first—press it down well for a solid foundation!
Take your softened cream cheese and place it in a large mixing bowl. Beat it with an electric mixer until smooth and creamy. This step is vital as it ensures your No-Bake Oreo Cheesecake filling will be free of lumps. The texture should be velvety—perfect for incorporating in the next steps.
Next, add powdered sugar and vanilla extract to the cream cheese. Continue beating until fully combined. The sweetness of the powdered sugar balances the cream cheese perfectly, setting the stage for an incredible filling that will melt in your mouth.
In another bowl, whip some heavy whipping cream until soft peaks form. This is where the magic happens! Gently fold in the whipped cream into your cream cheese mixture. Take your time with this step; the goal is to keep the mixture light and airy, giving your cheesecake its wonderful texture.
Crush some more Oreo cookies and fold them into the mixture—these chunks will add a delightful surprise in every bite of your No-Bake Oreo Cheesecake. Stir gently, ensuring you distribute the Oreos evenly without deflating your whipped cream.
Pour your luscious filling into the prepared crust. Smooth the top with a spatula, ensuring an even, enticing surface. It’s hard to resist licking the spatula at this stage; the cheesecake filling is simply divine!
Cover your cheesecake with plastic wrap and place it in the refrigerator for at least 4 hours, or overnight if you can wait. This chilling time is crucial as it allows the cheesecake to set properly, giving you that perfect slice in the end. Waiting is the hardest part, but trust the process!
Once chilled, carefully unlock the springform pan and lift the cheesecake out. Serve slices with a drizzle of chocolate sauce or a sprinkle of crushed Oreos on top for an extra touch. Each bite will be a celebration of flavors and textures!
Notes
Notes
Note 1: Ingredient Quality Matters
Choose high-quality cream cheese and fresh heavy whipping cream for the best flavor and texture. The quality of your ingredients directly impacts the taste of your No-Bake Oreo Cheesecake.
Note 2: Timing is Key
Allowing the cheesecake to chill properly is essential for achieving the right texture—don’t rush this part! If you’re short on time, consider making it a day ahead.
Note 3: Variations and Add-ins
Feel free to experiment! Try adding different flavors of instant pudding to the cream cheese mixture for unique twists. You can even mix in different types of cookies for an exciting flavor profile.
Let’s Talk Toppings!
Get creative with the toppings! Consider adding whipped cream, mini chocolate chips, or even a layer of ganache on top of your No-Bake Oreo Cheesecake just before serving. Each addition can elevate this dessert to a whole new level. Plus, it’s a great way to personalize your cheesecake for gatherings or special occasions!
- Prep Time: 30 minutes
- Cook Time: 0 minutes